
Learning to Refer to Objects in AppleScript Studio
Wednesday, 2003-09-17; 00:07:00
Last week, I went through a tutorial that outlined how to create a very simple AppleScript Studio application. I went through the basics of using Project Builder and Interface Builder, how to set up a preliminary project and interface, and how to get text to display in a dialog and in a text field, all through the language of AppleScript. This week, I'm going to get a little more detailed into one of the most important topics of AppleScript Studio: referring to objects. In going through this tutorial, you'll learn how to refer to and manipulate various objects like buttons, text fields, and other standard interface objects so that you can create your application with an interface that is best tailored for the features that you want to implement.
1. If you haven't already done so, create a new project, and open up the "MainMenu.nib" file. (Remember that to do so, you must first have the "Files" tab selected. Then, click the disclosure triangle next to the Resources folder that is under the Groups & Files list on the left side of the main Project Builder window. Inside that folder, you should find the "MainMenu.nib" file that we want to open; simply double-click it, and Interface Builder will launch and open the file.)
Remember that, by default, the interface is set up to have one window. In the MainMenu.nib window (not the MainMenu.nib - MainMenu window), there should be a little mini-icon of an Aqua window, and should be named simply "Window".
2. To change the name, simply double-click the word "Window". For now, change it to "Main Window".
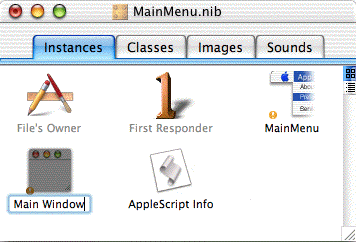
The MainMenu.nib window
Keeping track of a window's title in Interface Builder is confusing; this is mainly because, when using AppleScript Studio, a window has four different names. The first name is the one in the MainMenu.nib window -- this will be called the "display name". The second name is the actual title of the window which appears in the window's title bar when you run the application -- this will be called the "window title". The third name is the window's "auto save name"; more about this later. The fourth and last name is the name that you use to refer to the window when creating your AppleScript code -- this will be called the "AppleScript name". We just set the display name; the latter three names you have to set in the window's Info window.
3. Open up the info window, by selecting the "Main Window" icon in the MainMenu.nib window. Then press Command-Shift-I, or select Show Info from the Tools menu.
4. When the NSWindow Info window comes up, select "Attributes" from the pop-up menu at the top of the window, or press Command-1.
Here we can set the window title: see the text field next to where it says "Window Title:"? That's the window title, which appears in the title bar of the window. For simplicity, let's set this title to have the same name as the display name.
5. Change the window title to "Main Window".
Right under the Window Title: text field is the Auto Save Name: text field. This name is very important, because you can gain a critical feature simply by filling in this field. If you do, the location of the window on the screen will automatically be saved to preferences when someone quits your application; you don't have to write a single line of code -- all you have to do is fill in this field.
6. Set the auto save name to be the same as the window title and display name: "Main Window".
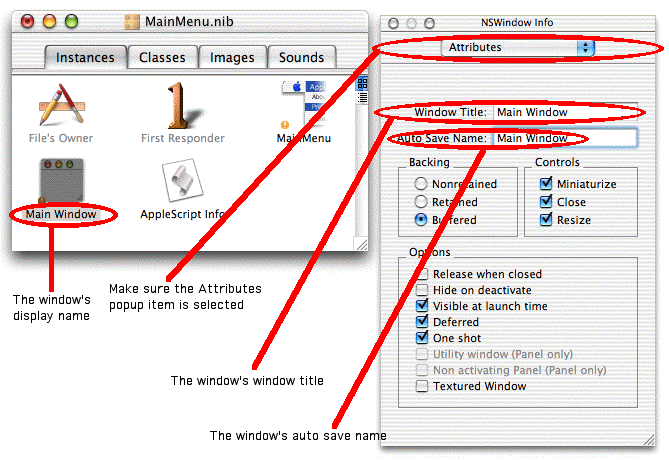
The MainMenu.nib window and the NSWindow Info window showing three different names assigned to a single window
7. Now, in the popup menu at the top of the NSWindow Info window, select "AppleScript", or press Command-6.
You should now see a single text field right below the popup menu that is simply named "Name:". This is the AppleScript name of the window.
8. Set the AppleScript name of the window to "Main Window". You've now set all four names of your main window.
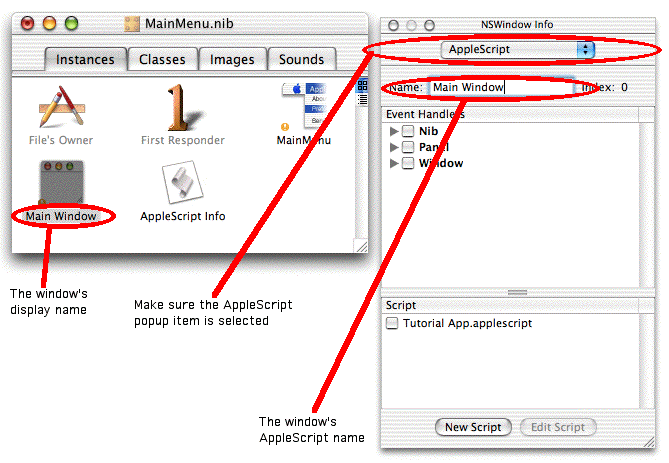
The MainMenu.nib window and the NSWindow Info window showing two different names assigned to a single window
Let's set up an interface with a few buttons, a few progress indicators, and a slider.
9. In the interface objects palette (which shows you what you can place in your interface), click on the "Views" button -- if there are no button labels, control-click somewhere in the toolbar, and select Icon & Text to show the labels.
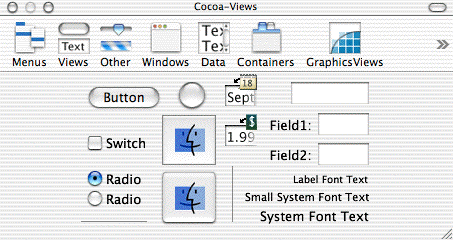
The interface objects palette, showing the Views section
10. Drag a button, a switch, a radio button set, a system font text, and a blank text field from the interface object palette to your main interface window (if you haven't already done so, double-click the icon named "Main Window" in the MainMenu.nib window to show your application's main window, which is where you are going to place your interface objects). Set it up as in the picture below -- remember that you simply have to click once on an object and then click and drag the red handles to resize an object.
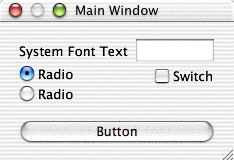
The completed interface
Setting up the interface to be exactly like the above picture is not necessary. Just make sure you have the same interface objects, so you can follow along when working on your AppleScript project. Also, remember that the blue guide lines that show up help you to make your interface more visually appealing and more consistent with other Mac OS X applications.
All of the interface objects we just placed can be customized. Simply press Command-Shift-I or select Show Info from the Tools menu (make sure the Attributes popup item is selected). Here you can set whether a button is enabled or disabled, small or normal size, the equivalent keyboard command, and the title of the object.
For the purposes of this tutorial, we're just going to set the name of each object. You can quickly set the name of each interface object by first opening the Info window. Then, one by one, select the interface objects, and set their name -- to do so, you'll change the "Title:" field to the desired name. As you click the different objects, the Info window will change to show you the attributes of the currently selected interface object. The radio button set is different: click once to select the set, and then double-click on the radio button whose name you want to change. Now you can set the name of the radio button -- single-click the other radio button to change its name.
11. Make your interface look like the picture below.
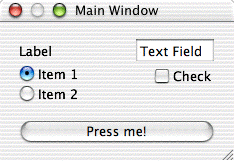
The customized interface
We've set the title of all the interface objects, but we haven't set their AppleScript names. This is essential when building an AppleScript Studio application -- without the AppleScript name, you have to refer to an object by its index number, which isn't terribly convenient.
12. To set up the AppleScript name of each object, first select "AppleScript" in the popup menu of the Info window, or simply press Command-6. Now, as you did before, select each interface object, in turn, and change it's AppleScript name -- set the AppleScript name to be the same as the title of the interface object, so you won't get confused as to how to refer to an object.
Now we want to set it up so your interface objects actually do something. We want your application to do something when you click the "Press me!" button, when you check or uncheck the "Check" checkbox, when you select a different radio button, when you edit the text field "Text Field", or when you move your mouse over the label "Label". This is a crucial step when setting up AppleScript Studio applications.
13. Select the "Press me!" button by clicking on it once.
If you haven't closed the Info window, you should see the AppleScript name of the button, and a list of checkboxes under the heading "Event Handlers". This is where we select to which events that the interface object responds.
14. In the Event Handlers list, click the disclosure triangle next to the checkbox named "Action". Then check the checkbox named "clicked".
This tells the button to respond to being clicked. However, it doesn't tell it in which script your code resides. You can have numerous different scripts in a single AppleScript Studio project -- how does the button know which script to look into in order to do what it's supposed to do? Simple: you just have to check the correct script in the "Scripts" list at the button of the Info window.
15. Check the checkbox next to your one and only script in the "Scripts" list in the NSButton Info window. The script should be named the name of your project, except with ".script" at the end of the name.
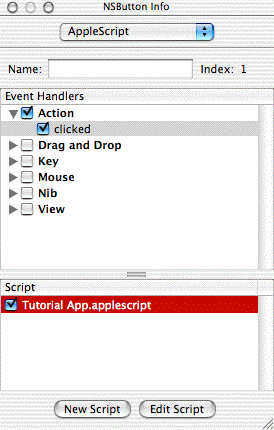
The button is ready to execute code!
16. For the checkbox named "Check", check the checkbox for the "clicked" action (under the Action section), and select your script.
17. For the text box named "Text Field", check the checkbox for the "end editing" action (under the Editing section), and select your script.
18. For the text field named "Label", check the checkboxes for the "mouse entered" and "mouse exited" actions (under the Mouse section), and select your script.
19. For the radio buttons, single-click on the set of radio buttons, double-click to select a single radio button, and then check the checkbox for the "clicked" action (under the Action section). Remember to also select your script. Single-click on the other radio button, and set up its AppleScript name and designated script as well.
20. Now, reselect one of the interface objects you just set up (like the Press me! button). Over in the info window, make sure you've got AppleScript selected in the popup menu, and click the Edit Script button down at the bottom of the window. This will open up Project Builder, and will automatically set up the required on-end blocks in your script for each of the actions that we selected.
You should now have 4 on-end blocks: "on clicked theObject"/"end clicked", "on mouse exited theObject event theEvent"/"end mouse exited", "on mouse entered theObject event theEvent"/"end mouse entered", and "on end editing theObject"/"end end editing". If you don't, go back to Interface Builder, select each interface object, and make sure that you actually checked the box next to your script in the Script section of the Info window. Remember, make sure that AppleScript is selected in the popup menu.
Now we're ready to start writing some code! First, let's make a dialog show up when we press the "Press me!" button.
21. In your script in Project Builder, put the following code in between the "on clicked theObject" and "end clicked" lines:
display dialog "Ouch!"22. Now, save the script, and build your application. Click the "Press me!" button, and watch your dialog show up! Save any and all files before building (Project Builder should automatically ask you).
But, wait! Click on the checkbox, or on one of the radio buttons. Uh, oh: the dialog shows up when you click those things, too! We don't want that. Let's fix that. Go back to your code in Project Builder -- we need to make sure that certain code only applies to our specific button.
23. Change the code we just wrote from:
display dialog "Ouch!"
to:
if (name of theObject is "Press me!") then display dialog "Ouch!" end ifIf you haven't coded in AppleScript before, the syntax is pretty straightforward, since it's human-readable. You should be able to easily follow along and customize the code that's presented in these tutorials.
24. Build and run the project now. Notice how the dialog now only shows up when you press the "Press me!" button. This is the desired behavior.
Now let's set up some code for the other buttons. We want the checkbox to change the label that we also placed in the interface.
25. Go back to Project Builder, and add this code right after the end if line that we just put inside the "on clicked theObject"/"end clicked" block (also called the "on/end clicked" block):
if (name of theObject is "Check") then if (state of theObject is 1) then set contents of text field "Label" of window "Main Window" to "Check is on!" else set contents of text field "Label" of window "Main Window" to "Check is off." end if end ifAs a quick aside, note how newly typed code looks differently from code that has been typed before you last built the project? That's because it's been checked for correct syntax. This always happens before the project is built, just like a compiler compiles C, C++, or Objective-C code before running your app. If you want to make sure your syntax is correct without having to initiate a build of your app, simply press the enter key on your keyboard's keypad, press Command-K, or select Check Syntax of Current File from the Build menu.
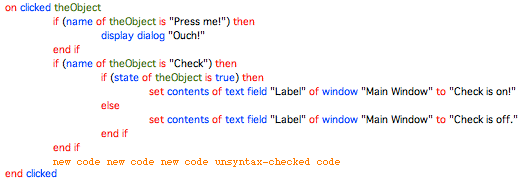
Code that hasn't had its syntax checked is, by default, orange, and in the Courier font. Syntax-checked code is multi-colored and uses the Geneva font.
Back to the checkbox. Note how we first checked that the name of the object was "Check". But then inside, we accessed the state of the checkbox, now that we confirmed that it is indeed the checkbox. For checkboxes, a state of "1" means that it is checked, and a state of "0" means that it is not. There are a few other properties that we can access or set. Let's do this for the radio buttons.
26. Add this code inside the on/end clicked block that we were just editing:
if (name of theObject is "Item 1") then set enabled of button "Check" of window "Main Window" to false else if (name of theObject is "Item 2") then set enabled of button "Check" of window "Main Window" to true end ifNote how it doesn't even matter that the radio buttons are part of a matrix -- we can still refer to them by name when an action is performed on them.
27. Inside the on/end mouse entered block, add this code:
if (name of theObject is "Label") then set contents of text field "Text Field" of window "Main Window" to "Hi!" end if28. Add the above code inside the on/end mouse exited block as well, except changing the "Hi!" to a "Bye!"
Note again how we refer to interface objects. Interface objects exist in a hierarchy of more general interface objects. When we want to change the string in a text field, we first start with the contents of it (contents), which is contained in the text field itself (of text field "Text Field"), which exists inside the window itself (of window "Main Window"). An interface object doesn't necessarily just live inside the main window: it could live inside a tab view, which could be in a drawer. So when you write AppleScript code, you need to know the precise hierarchy of where the object exists; as you get more advanced, you'll find some rather annoying oddities. For example, for a tab view, a button existing inside of it would be referred to like so: button "Press Me!" of view of tab view "Tab View" of window "Main Window" -- note the extra "view". But I'm getting ahead of myself; you'll learn things like these in due time.
29. The last thing we're going to do is perform an action after finishing editing the text field. Let's do something wacky this time.. we'll complete hide the text field named "Label". This is just another simple property of an interface object like "state" and "name". Add this code inside the on/end editing code block:
if (visible of text field "Label" of window "Main Window" is true) then set visible of text field "Label" of window "Main Window" to false else set visible of text field "Label" of window "Main Window" to true end if30. Build and run your program. Test all the stuff that we just did: check and uncheck the checkbox, click on each radio button, move your mouse over the "Label" text field (which probably has a different title, now), and type something in the other text field. Note that to actually "finish editing", you need to press the enter or return key on your keyboard. If we had another text field, you could also "finish editing" by clicking in that other text field.
That's it for this time! Hopefully you've learned a little more about how to manipulate and refer to different interface objects that you can use in your AppleScript Studio application. But we're just scratching the surface at this point. There's a lot more to AppleScript Studio!
So this is the end of the second tutorial. How am I doing? Am I going too fast, too slow -- am I thoroughly explaining exactly how to do things in Interface Builder and Project Builder? If you have any questions, or suggestions for topics of future tutorials, I'd certainly welcome them. Please, do let me know what you think of my tutorials, so that I can make better ones in the future.
Technological Supernova Publications Older Newer Post a Comment


