


Rearranging the MacBook Keyboard Keycaps
Monday, 2008-03-24; 14:17:44
visual walkthrough of how to rearrange the keycaps of a newer MacBook without breaking them
One of the primary reasons that I do this is because I'm a bilingual typist. It's practically absolutely necessary to know QWERTY if you ever want to use public computer terminals or someone else's computer, so I'd bet that any self-professed Dvorak layout user is also proficient at QWERTY. For me, the problem is that I use the keycaps as a point of reference for what keyboard layout I'm using. When I first sit down to the computer, I take a quick look at the keycaps to remind me which layout I'm using, and then I'm off -- but I don't actually need to look at the keyboard when I'm typing, for both QWERTY and Dvorak.
But when I'm using the QWERTY layout with keycaps that are physically arranged in the Dvorak layout, or vice versa, I get temporarily confused. (This is particularly troublesome for passwords.) Thus, if my main layout is Dvorak, I just like my keycaps to show Dvorak as well.
All desktop keyboards in recent memory on any Mac I've ever used have keycaps that are easily arranged. (Not sure if our ancient Mac IIsi or Mac Plus keyboards were re-arrangeable, though, or even if they had the Dvorak layout installed by default.) Find a tool with a flat edge — I typically use one end of a fingernail clipper, even though a flathead screwdriver would do quite nicely (my bathroom is usually closer than the garage, natch) — wedge it under each keycap, and gently pull up. The keycaps come off easily, rearrange them to the desired layout, and then press down on them. Easy as pie.
Only recently, however, have I started to use a laptop regularly, and rearranging the keycaps on these is significantly more difficult and time-consuming. That's not to say, however, that it's particularly difficult at all; it just seems like it at first, and it seems like you're going to break things, even though you don't.
Earlier MacBooks have keycaps that use a mechanism with a metal bar, and there's already an instructable that shows how to rearrange the keycaps on these MacBooks. It has good pictures and good descriptions, and I was able to follow it to rearrange the keycaps on my older MacBook.
I just (Wednesday) got a newer MacBook, however, and unbeknownst to me, it actually uses a different keycap mechanism. I noticed that the keyboard felt significantly different on this MacBook (they are quieter and a bit more spongy), but I thought that was just because it hadn't been used as much as my older one. However, the aforementioned instructable doesn't work with these new MacBooks — getting a keycap off was much different and produced different results.
In a few Google searches, I couldn't find any step-by-step instructions that show how to rearrange the keycaps on these new MacBooks; this entry is an attempt to rectify that situation. Sorry, I don't have a macro lens on my crappy digital camera, but these photos should be good enough. If some enterprising user with a macro lens and one of these newer MacBooks wants to send me along some higher-quality, less-blurry photos, I'd greatly appreciate it (and would gladly give credit).
The first thing you need to do is, obviously, take off the keycaps. Before you attempt to do this, you need to understand how these keycaps work. Here's a partial picture of the MacBook keyboard, with a few of the keycaps already removed.
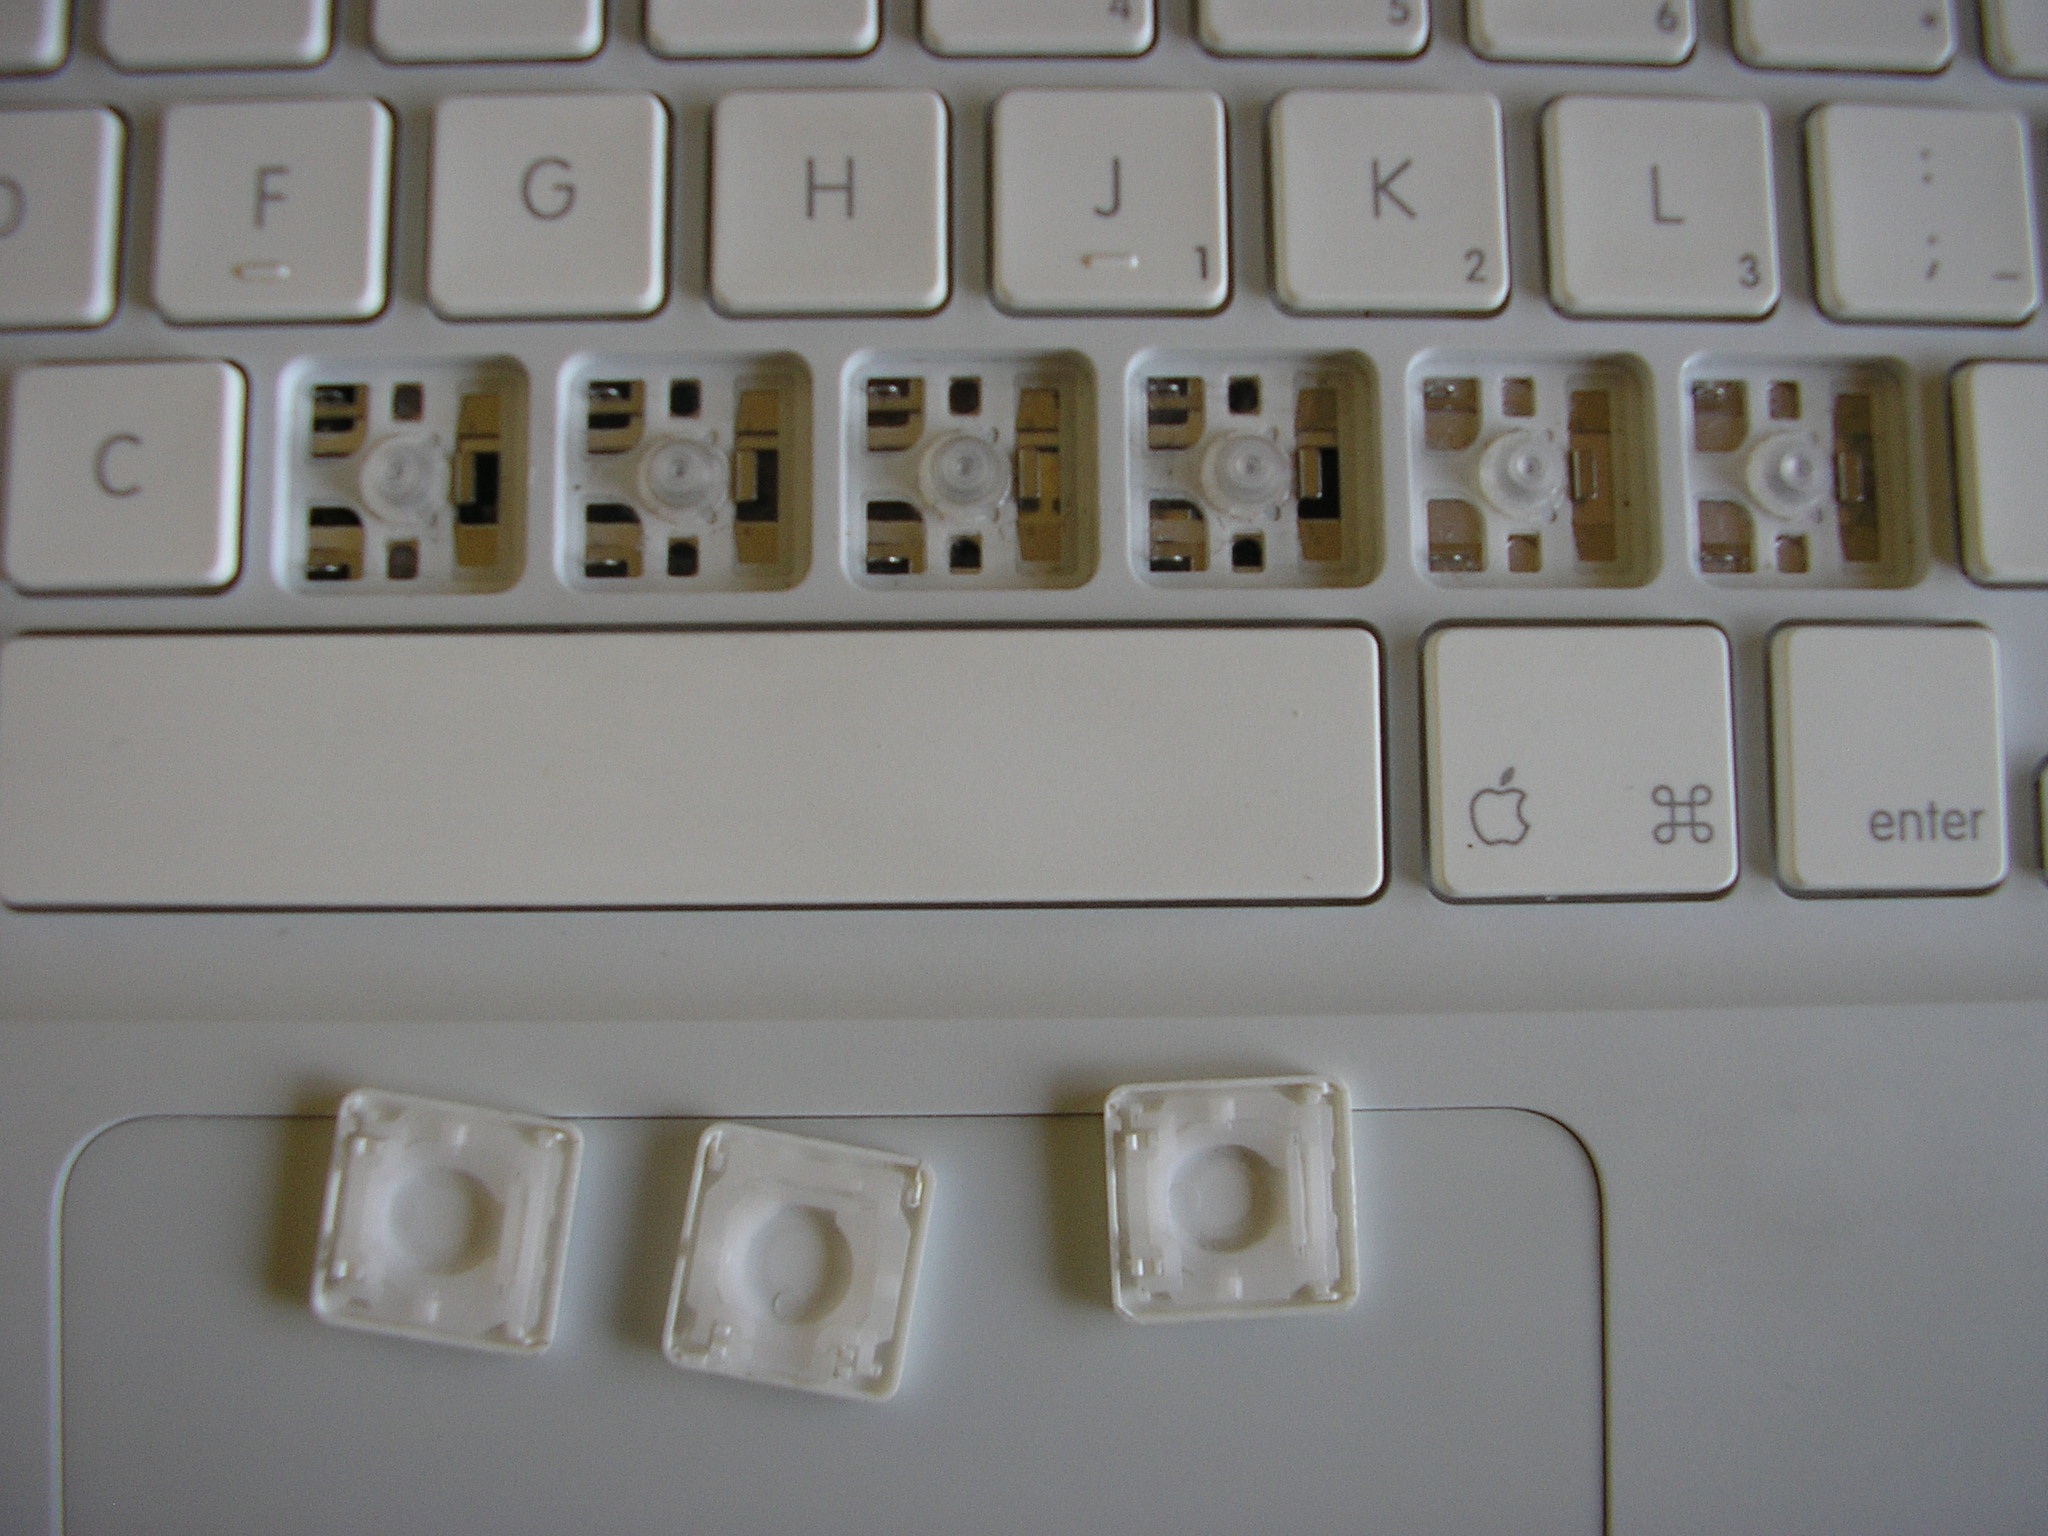
Look at the one of the places where a keycap has been removed: you should see two little metal holes on the upper-left and lower-left corners. Now look at one of the keycaps: you can see two concentric, white, plastic, ring-like pieces. This is the plastic scissor mechanism that allows the key to work. Looking at the right-most keycap in this picture, the left side of the mechanism — which is slightly shorter — is going to insert into the aforementioned metal holes.
Look back at the place where a keycap has been removed. On the right side, you can see a small metal flap. The right side of plastic mechanism of the keycap needs to slide under that metal flap to hold it down.
Knowing how the mechanism works reveals how to remove a keycap: you need to first get the plastic mechanism out of the little metal holes. This will allow you to slide it off to the right which will remove the other side of the plastic mechanism from underneath the metal flap. Then you can just lift off the keycap.
Step 1: Remove all of the keycaps from the keyboard. To do this, get a tool with a small, flat end (a jeweler's flathead screwdriver is ideal), and slip it under the lower-left corner of any keycap. You might need to lift up the keycap ever so slightly to see underneath, but you should be able to see the plastic scissor mechanism. Push the scissor mechanism on the lower-left corner so that you push it out of the lower-left metal hole. Once this happens, it should come out of the upper-left hole as well, since the spring back of the lower-left corner pulls the upper-left corner out. Then just slide the keycap off to the right to unhook it from the metal flap, and lift it off.
Step 2: Now you've removed all the keycaps, but the scissor mechanism is still attached to each one. We need to remove each scissor mechanism from each keycap. To do this, simply insert your small tool underneath the shorter end of the scissor mechanism and lift up (see the following photo). It should snap off — don't worry, you haven't broken anything.

Repeat this step for all keycaps, so you should have a set of bare keycaps and bare scissor mechanisms.
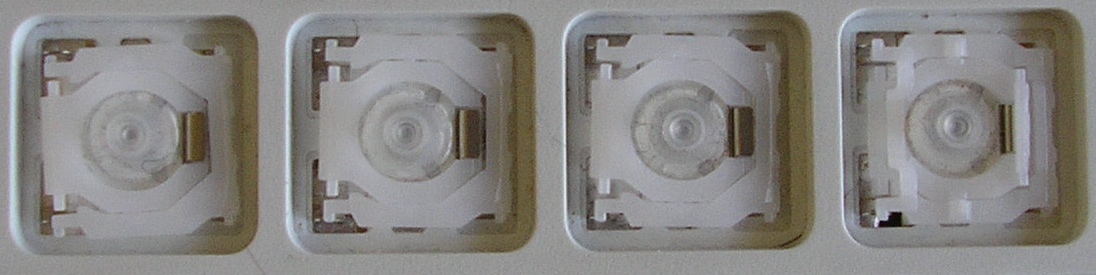
Step 3: Physically place the scissor mechanisms back in the holes where the keycaps have been removed. Don't worry about putting the mechanism under the flap or in the holes just yet; for now, worry about the orientation. Note that there is only one orientation in which this scissor mechanism can function. The side of the mechanism facing up should be flat — if it has bumps in it, it's upside-down. The shorter side of the mechanism with the two plastic bars should also go on the left side.
The following photo shows the orientation in which the scissor mechanism should be placed. The scissor mechanisms in the left three keycap holes are placed correctly; the right-most scissor mechanism is placed with the bottom side facing up instead of down.
Repeat this step for each scissor mechanism.
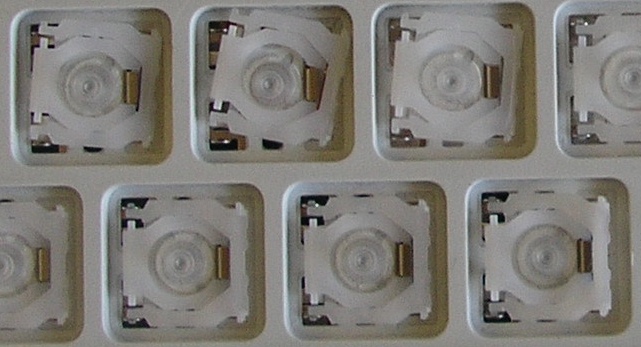
Step 4: Slip the right side of the scissor mechanism under the metal flap on the right side of each keycap hole. Only the inner plastic ring piece will slip under the metal flap; the outer ring will not. The top row of scissor mechanisms in the following photo have been slipped under the metal flap.
Repeat for each scissor mechanism.
Step 5: Slip the scissor mechanism into the metal holes on the left hand side. You should easily be able to place one of the plastic bars into one of the holes — the top one is your best bet, here. Then, with your tool, you need to bend the lower-left part of the scissor mechanism so that it, too, can slip into the other metal hole. (This is very similar to what you had to do in order to get the keycap off in the first place.)
The three scissor mechanisms in the bottom row of the previous photo have been placed in the metal holes as well, so they're completely in place.
Repeat for each scissor mechanism.
Step 6: You've passed the hard part. This last step is easy. Just place the keycaps in their positions, and press down hard. You should hear a few clicks. Press down in different places of the keycap to make sure that all parts snapped.
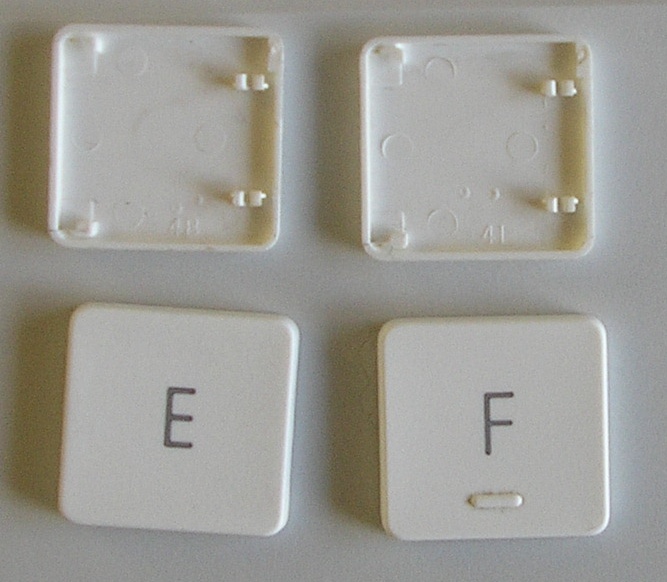
The only tricky part of this step is to remember that each keycap can only go in one orientation. Some keys, like the 'z', 'n', and 's' keys look similar when they're upside-down or right-side up — flip these ones upside-down and you should easily be able to tell which way it goes.
In the following photo, there are two upside-down keycaps and two right-side up. The upside-down ones need to be rotated horizontally to be in the correct orientation — the two snap pieces that are closer together (on the right side in the photo) should be on the left side when they are right-side up.
Step 7: Now that all your keycaps and scissor mechanisms are back in place, the only thing left to do is to switch your keyboard layout. To do this, go to the International system preference pane, go to the "Input Menu" tab, and in the list of keyboard layouts, make sure the box is checked next to the layout of your choice. A new menu extra should have appeared in the right-hand side of your menubar -- click it, and you can now select your new keyboard layout to use.
Technological Supernova Tips Older Newer Post a Comment