


An Introduction to AppleScript Studio
Thursday, 2003-08-21; 23:33:00
So, you want to learn about AppleScript Studio? Well, you've come to the right place. AppleScript Studio is one of the exciting new technologies that Apple has integrated into its free developer tools in recent years, and it's one of the easiest ways to create professional-looking programs very fast, even if you have limited programming knowledge.
AppleScript Studio is basically the hybrid of two awesome Apple technologies that merge to create a fantastic project. On the one hand, we have AppleScript. AppleScript is a scripting language that is at the heart of Mac OS X, and allows one to control a vast array of different programs to be able to accomplish different things. The two main benefits of AppleScript are that it has an easy-to-learn syntax, and that it can perform an amazing variety of automated tasks by harnessing the power of the many different features of many different programs. AppleScript has always been limited however, because the AppleScript interface is limited to some very confining objects; mainly dialogs and lists. For such a powerful scripting language, AppleScript always languished because of this one major drawback.
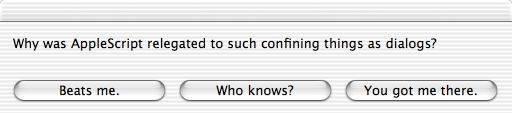
The interface limit of AppleScript applets before AppleScript Studio
Now no more. AppleScript Studio allows AppleScript to harness a vast array of different interface objects; in fact, AppleScript Studio applications can now use any native OS X interface object that regular Mac OS X applications can use! This includes buttons, lists, tabs, popup menus, radio buttons, and more. By integrating AppleScript into Project Builder and Interface Builder, a novice programmer can use simply AppleScript to control the advanced interface of his Mac OS X application while retaining the awesome cross-application capabilities of AppleScript.
Of course, AppleScript Studio may not be the best programming language of choice with which to make your Mac OS X applications. AppleScript Studio is still limited by what commands AppleScript can call in any application. And AppleScript is not nearly as fast as ubiquitous programming languages like C and C++. However, for the novice programmer who already knows the syntax of AppleScript and wants to create more advanced applications with an intuitive interface, AppleScript Studio may be the answer. Additionally, learning AppleScript Studio allows a programmer to step up more easily to creating Mac OS X applications in C or C++, since it uses the same exact programming tools to create programs: Project Builder and Interface Builder.
This tutorial goes through the very basics of creating a simple AppleScript Studio project. It assumes no knowledge of Project Builder or Interface Builder, and it also assumes no knowledge of AppleScript. If you want to create AppleScript Studio applications, knowledge of AppleScript would be very helpful, but by no means necessary, since AppleScript is a fairly easy programming language to learn.
Before we start, make sure you have downloaded the latest Developer Tools from Apple. Simply go to http://connect.apple.com/, sign up for a free Apple Developer Connection account, and download the Mac OS X developer tools. (To do so, log in, click "Download Software", click the "Mac OS X" subheading, and then download the December 2002 Mac OS X Developer Tools -- it should be roughly 300 MB in size. Don't worry about the Dec 2002 gcc Updater. If you have a dialup connection, you should be able to find the developer tools on one of the CDs that came with your Mac or in your Mac OS X retail box. The latest version of the developer tools is recommended, so make sure it isn't an earlier version of the developer tools on your CD.)
So let's get started!
1. Open Project Builder. Select New Project... from the File menu or press Command-Shift-N
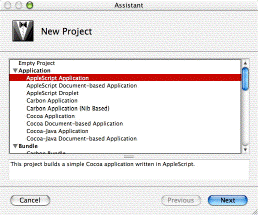
The new project Assistant window
2. Choose AppleScript Application from the list. You can also choose AppleScript Document-based Application if you wish, but this is only a worthwhile choice if you're going to make a program that creates and edits documents (like a word processing program or an HTML source editing program). For now, let's stick with the vanilla AppleScript Application.
3. Click Next, choose a name and a destination, and then click Finish.
Now you're ready to start writing your application! First, let's get you acquainted with Project Builder. On the left, you should have a listing that has a heading of Groups & Files. If not, make sure the Files tab is selected -- there are 5 sideways tabs going down the right side of the left pane: Files, Classes, Bookmarks, Targets, and Breakpoints.
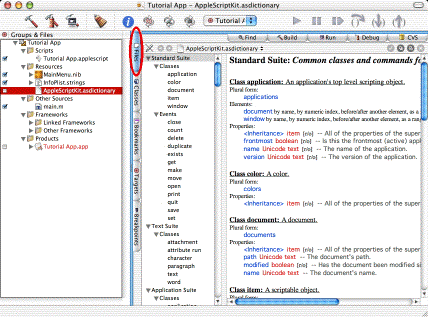
The main Project Builder window, with the Files tab selected
Click the disclosure triangles for the 5 main groups in the file listing -- they should be (in order from top to bottom) Scripts, Resources, Other Sources, Frameworks, and Products. Make sure that the very top group, which is the project itself, is also revealed.
The files inside the Scripts folder is where you're going to write your actual code. Note that, by default, you'll have one script in this folder. You can either opt to place all your code in this one big script, or you can create new script files and have some of the code be in separate scripts. Either will work, although I'd probably suggest separate scripts, so that you can manage your code more easily. For this project, we won't need any more than one script file.
The files inside the Resources folder are more files that you'll probably modify to customize your AppleScript Studio application. MainMenu.nib is going to be your application's interface (more on this, later). InfoPlist.strings is a file that contains a few pieces of information, like the version number, the copyright notice, and the name of the application.
The file named AppleScriptKit.asdictionary in the Resources folder deserves special attention. If you click it, an AppleScript Studio reference file will appear in the right side of the Project Builder window. This is where you'll be able to look through to find the appropriate references and commands that will refer to objects in your application's interface. If you don't know how to refer to something, click on this entry in the list and browse the dictionary for the right syntax. This can be incredibly handy.
The other two folders, Frameworks, and Products, are probably things that you won't touch. "Frameworks" lists the frameworks that your AppleScript Studio application will use. If you're going to use other frameworks, you're going to need to reference them in this folder before you can use them. For the most part, though, you won't need to do this. "Products" just shows a hierarchy of your completed application when you finally build it.
Now bring your attention to the Project Builder toolbar. For now, you just need to concern yourself with the first three buttons on the left (assuming you're using the default toolbar). The first is Build, which looks like a hammer. When you've partially implemented a feature and want to test it out, you're going to first need to build your program. This packages it into an application package that will run when double-clicked. The Clean button wipes any existing built executable that you've created before, so that you can test out your application from a clean slate. Build and Run is similar to Build, except for the fact that it immediately launches your built application after Project Builder has finished building it. This is very handy for when you actually want to test out something you just wrote.

The default Project Builder toolbar, with the three important buttons circled
Now you're familiar enough with Project Builder that we can actually start building an application. To actually start making an application, you'll first need to create an interface with Interface Builder.
4. Open Interface Builder by double-clicking on the MainMenu.nib file that's directly inside the Resources. Interface Builder should automatically start up and display the MainMenu.nib file.
When Interface Builder starts up, 4 windows will show up. One is a floating palette called Cocoa-Views. One is named MainMenu.nib, that contains 4 tabs -- Instances, Classes, Images, and Sounds. The last two windows are named MainMenu.nib - MainMenu, and Window.
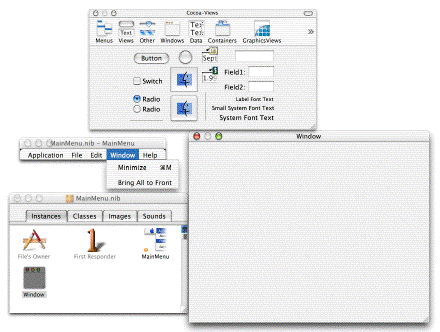
The four default windows that show up when you open Interface Builder from Project Builder
The Cocoa-Views palette shows all the different interface elements you can place in your AppleScript Studio application. These are exactly the same elements you can place in a standard Cocoa application written in Objective-C, C, or C++; this is one of the big advantages of AppleScript Studio over regular AppleScript applets -- you can use all the interface elements available to normal applications, instead of being relegated to 3-button dialogs and lists, which is all that AppleScript applets can use. Click the icons at the top of the palette to cycle through the different kinds of elements that you can place into your application.
The MainMenu.nib window shows an abstract version of your application's interface. In the Instances tab, it has icons for the menubar (that appears at the top of the screen when you switch into your application), any windows you have, and File's Owner and First Responder, which are abstract concepts that you probably won't need to deal with. The Classes tab is pretty much useless to AppleScript Studio developers, since these are Objective-C Cocoa classes. The other two tabs, Images and Sounds, show you what images and sounds you have available at your disposal to use in your application.
The MainMenu.nib - MainMenu window is a floating version of the menubar that will be used when your application starts up. You can use the Cocoa-Views palette to add items to this list if needed, and you can also double-click any menu item to rename it (triple-click a menu title to edit those).
The last window, with an amazingly original name of Window, is where you're actually going to start placing your interface elements. This is only a default window -- you can create as many windows as you like; you're certainly not limited to this one.
So let's create an interface and show how to hook up your interface elements to actual AppleScript code that will power your application! Before we start, let's make things a little easier by changing the name of that window named Window.
5. In the MainMenu.nib window, select the little icon that looks like a window, and press Command-Shift-I, or select Show Info from the Tools menu.
6. Make sure Attributes is selected in the Info window popup menu at the top, and then change the window title name to "Tutorial App Window".
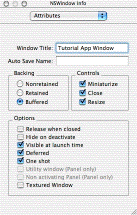
The Info window with the corrected window name
7. While in the Info window, choose AppleScript from the popup menu (or press Command-6). In the Name field, type "Tutorial App Window". The name in the AppleScript info panel is what we use to refer to the window, NOT the title.
8. In the Cocoa-Views palette, click the Views toolbar button (which looks like a button above a text field), to show the buttons and text fields you can use in your application.
9. To start, drag a button and a text field to the Tutorial App Window window. To make sure we're on the same page, use the button that's labeled with the title Button, and the blank text field at the top right of the window (not the two attached text fields that are named Field1 and Field2).
10. Drag the text field near the top left corner of the Tutorial App Window window. You should notice that guide lines appear when you're near the edge of the window, and again when you're right up against the edge. Line up the top left corner of your text field to correspond with the "near-edge" guide lines.
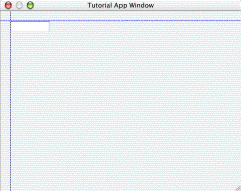
The "near-edge" guidelines appear when you drag an interface object relatively close to the edge of the window
11. Now, click the text field once. 8 red dots should appear around the text field; you can use these to resize the text field. Click and hold on the right-most dot that is not on the corner of the text field. While still holding down the mouse button, drag to your right: the text field should resize. Keep dragging until you hit the "near-edge" guide line on the right side of the window.
12. Now, position the button underneath your stretched text field. When you position it, note that you'll see the same "near-edge" guide line appear for the left side of the window, but you'll also see a guide line when the button nears the bottom edge of the text field. This helps ensure that your application's interface looks good by keeping a specific distance between interface elements.
13. As before, stretch the button to the right side of the window, lining it up with the "near-edge" guide line.

The button has now been placed in the window and stretched
14. Now, grab the Tutorial App Window window's resize handle, and drag up towards the button. If you've set things up right, you'll hit the minimum height for the window, and it won't let you shrink it down vertically any more.
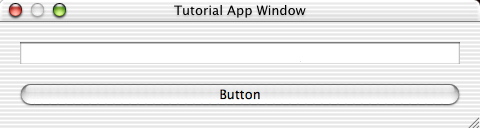
The completed window
You've got a preliminary interface set up! Now, we'll set up the hooks to your future AppleScript code.
15. Click on the button once. Then, press Command-Shift-I, or select Show Info from the Tools menu. This will bring up a floating panel that will allow you to customize the appearance and actions of your button.
For now, we'll ignore the Attributes section, and instead concentrate on making your button actually DO something.
16. At the top of the Info window (which should be named NSButton Info if you've selected the button), select AppleScript from the popup menu. You can also just press Command-6 to jump to the correct info window panel.
Here is where you define to what actions your button will respond. In the Event Handlers section, you can click on the disclosure triangles to reveal all the possibile actions. For now, we'll just use a simple click.
17. Click the disclosure triangle for Action. A single checkbox should be revealed, named "clicked". Check it.
18. Now, in the Script section of the Info window, select your one and only script. It should have the same name as your project, except with ".script" appended to the end.

The Info window when focused on the button's AppleScript properties
19. We have to give our text field a name for AppleScript to refer to it, too. So, click on the text field. The Info window should automatically change to have a title of "NSTextField Info" instead of "NSButton Info", and the "clicked" action should no longer be selected. In the Name field (like we did before for the window), type "Text Field 1".
20. Choose Save from the File menu to save our newly completed interface.
21. Click on the button again. The Info window title should change back to "NSButton Info". Now click the Edit Script button.
Project Builder should be activated, and your script will automatically be selected and shown in the main view. Additionally, Project Builder should automatically insert the surrounding on/end block that will allow you to write the code that will execute when your button is clicked. It should show up like this:
on clicked theObject (*Add your script here.*) end clickedWe're going to edit this script to just display a simple dialog, and a message in the text field.
22. Replace the following line of code:
(*Add your script here.*)with:
display dialog "Hello world!" set contents of text field "Text Field 1" of window "Tutorial App Window" to "Hello world!"Note that the first line of this code is identical to how you would display a dialog in a regular AppleScript applet. That's another benefit of AppleScript Studio: you don't need to learn any new syntax at all! The second line tells the text field to display "Hello world!", by referring to its position in the interface hierarchy. We want to change the contents of the text field, which is part of the text field itself, which is part of the surrounding window.
We're now ready to build your application.
23. Press the Build and Run button in the Project Builder toolbar.
24. Click Save All if the dialog comes up (since we haven't saved your script yet). NOTE: If Project Builder appears to be doing nothing, switch back to Interface Builder -- there may be some residual changes that need to be saved before Project Builder will build your project.
Once your project is built, it should start up, complete with an icon showing in the Dock (albeit a plain application icon). Your main window should show up, complete with your blank text field and button. Now, click the button; your dialog should show up, and after dismissing the dialog, the text field should be filled in with the phrase "Hello world!". Congratulations, you've completed your first AppleScript Studio application!
That's the end of this preliminary AppleScript Studio tutorial. Although we didn't create much of an application, you've learned a lot about getting around Project Builder and Interface Builder, and a bit about referring to objects with AppleScript. This knowledge should allow you to start creating more advanced projects, with the help of the AppleScript Studio documentation (don't forget the AppleScriptKit.asdictionary file in the Resources folder!).
This is Simone Manganelli, signing off from OSXFactor.com . Keep your eyes peeled for future AppleScript Studio tutorials.
Technological Supernova Publications Older Newer Post a Comment