


Creating Universal Binaries
Thursday, 2005-06-16; 20:07:00
Here's how to solve the problem that I ran into.
When trying to create universal binaries out of the programs that I write, I ran into an annoying problem: the compiler threw up a bunch of errors when trying to compile for the Intel architecture. For posterity, here they are:
It turns out that there are a few more things you need to do after checking the Intel architecture checkbox for your target. You also need to change the SDK you use to be the Mac OS X 10.4 Universal SDK, and you need to check the box for the Intel architecture for the Project itself.
Here's how you do it all:
1. Open your Project. Make sure you're in Project view.
2. Select the desired target in the Groups & Files source column.
3. Open the Inspector window.
4. Click the Build tab.
5. Select the configuration you want to change to build universal binaries in the Configuration popup menu. (Usually, this is just the "Deployment" configuration -- you want the "Development" one to stay for your native architecture so compile times are faster.)
6. Select "All Settings" in the Collection popup menu.
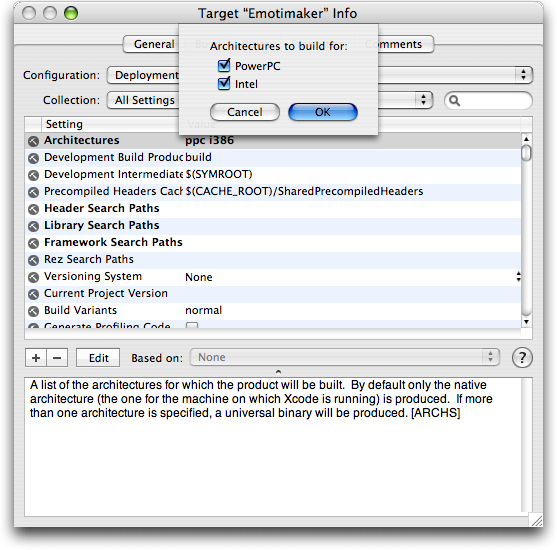
7. Select the Architectures setting (it should be at the very top).
8. Click the Edit button.
9. Make sure both "PowerPC" and "Intel" are selected, and press OK.
10. Close the Inspector window.
That's where I left off. Here are the remaining steps:
11. First, if you have more than one target, repeat steps 2 through 10 for each of them.
12. Select the file that represents your project in the Groups & Files source column. (This should be at the very very top of the list.)
13. Repeat steps 3 through 9 (don't close the Inspector window).
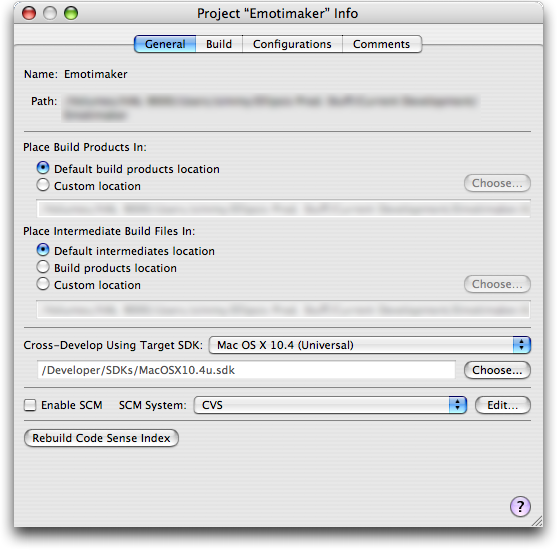
14. While your looking at the Inspector window for the project file, click the General tab.
15. In the Cross-Develop Using Target SDK pop-up menu, select "Mac OS X 10.4 (Universal)".
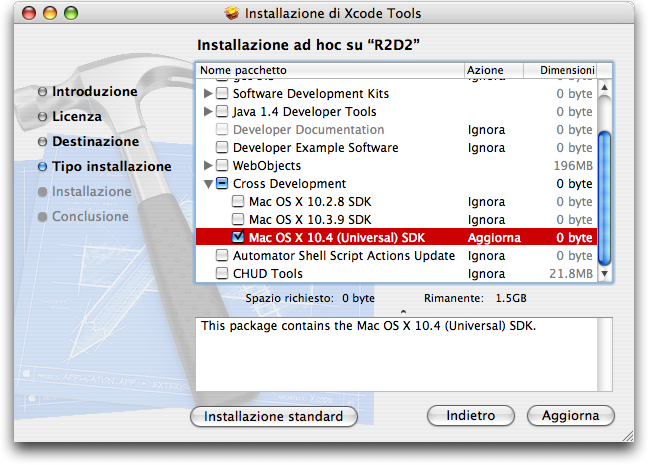
If you don't see this option, you'll need to install the 10.4 SDK. To do this, open the XCode 2.1 installer again, and do a custom installation. Uncheck everything. Reveal the "Cross Development" section, and check the "Mac OS X 10.4 (Universal) SDK" box. Install that, and then go back to step 14.
16. Close the Inspector window.
NOW you're done. :) (So basically, instead of one checkbox, it basically amounts to 2 checkboxes and changing a popup menu. I'm actually not even sure if checking the box for the project file is necessary. But anyway, not too shabby for an architecture switch.)
/usr/bin/ld: warning /System/Library/Frameworks/Cocoa.framework/Cocoa cputype (18, architecture ppc) does not match cputype (7) for specified -arch flag: i386 (file not loaded)
/usr/bin/ld: warning /System/Library/Frameworks/Security.framework/Security cputype (18, architecture ppc) does not match cputype (7) for specified -arch flag: i386 (file not loaded)
/usr/bin/ld: warning fat file: /usr/lib/gcc/i686-apple-darwin8/4.0.0/../../../libmx.dylib does not contain an architecture that matches the specified -arch flag: i386 (file ignored)
/usr/bin/ld: warning fat file: /usr/lib/gcc/i686-apple-darwin8/4.0.0/../../../libSystem.dylib does not contain an architecture that matches the specified -arch flag: i386 (file ignored)
It turns out that there are a few more things you need to do after checking the Intel architecture checkbox for your target. You also need to change the SDK you use to be the Mac OS X 10.4 Universal SDK, and you need to check the box for the Intel architecture for the Project itself.
Here's how you do it all:
1. Open your Project. Make sure you're in Project view.
2. Select the desired target in the Groups & Files source column.
3. Open the Inspector window.
4. Click the Build tab.
5. Select the configuration you want to change to build universal binaries in the Configuration popup menu. (Usually, this is just the "Deployment" configuration -- you want the "Development" one to stay for your native architecture so compile times are faster.)
6. Select "All Settings" in the Collection popup menu.
7. Select the Architectures setting (it should be at the very top).
8. Click the Edit button.
9. Make sure both "PowerPC" and "Intel" are selected, and press OK.
10. Close the Inspector window.
That's where I left off. Here are the remaining steps:
11. First, if you have more than one target, repeat steps 2 through 10 for each of them.
12. Select the file that represents your project in the Groups & Files source column. (This should be at the very very top of the list.)
13. Repeat steps 3 through 9 (don't close the Inspector window).
14. While your looking at the Inspector window for the project file, click the General tab.
15. In the Cross-Develop Using Target SDK pop-up menu, select "Mac OS X 10.4 (Universal)".
If you don't see this option, you'll need to install the 10.4 SDK. To do this, open the XCode 2.1 installer again, and do a custom installation. Uncheck everything. Reveal the "Cross Development" section, and check the "Mac OS X 10.4 (Universal) SDK" box. Install that, and then go back to step 14.
16. Close the Inspector window.
NOW you're done. :) (So basically, instead of one checkbox, it basically amounts to 2 checkboxes and changing a popup menu. I'm actually not even sure if checking the box for the project file is necessary. But anyway, not too shabby for an architecture switch.)
Technological Supernova Unfiled Older Newer Post a Comment